It is a great feeling when you've released your quality code with confidence to production. After that, the release notes have to get sent out to the interested parties. You write down on a list what exactly was in the release. It could be that a lot of changes were made, then the question of "what exactly was in the release?" comes up.
If you didn't track what went out in a release (e.g. related issues from the issue tracking system) it can be quite a chore to go back and check what exactly was put onto the production system. Is it possible to automate this? Yes. In this blog post I will show you how we automated this process.
- Author
- Arjan Frans
- Date
- November 2, 2022
- Reading time
- 5 Minutes
Tools we use
Gitlab and Docker are the two of the most important tools that we use to do releases. Our setup completely automates the builds and deployments of our applications. Gitlab has a feature called "Releases". You can either manually create a release document or create it directly from a CI/CD pipeline. Releases created in Gitlab are based on tags. Based on the changes between tags we know what changes have been made. Of course we chose to use the automated way of using releases.
New workflow rules
In order to be able to automate something there has to be structure. A good way to start is checking what is already available: merge requests can be linked to Gitlab issues. This is key to creating a relation between your code and the issues that will eventually end up in the release notes.
An existing specification for writing code commits is Conventional Commits. It also has a Node.js package that can be used to generate a changelog: conventional-changelog-cli. At first this seems like an easy thing to integrate, however there are some things to consider depending on your existing workflow. At Fusonic we use a squash + fast-forward merge workflow. In short this means that a merge request will eventually end up as one commit containing the merge request title in the message. I am skipping the explanation of the Conventional Commits convention, as you can read it on the website. Here are some examples of what we now name our merge requests:
- fix(#2): entity not persisted
- fix(#5): adjust incorrect response
- refactor(#3): change structure of controllers
- infra: increase disk space
- ci(#4): add codestyle linting
A category, an optional issue reference and a short description. Based on this information we can generate a changelog.
Enforcing MR title conventions
To make everything consistent it is important to enforce the above described rules. A tool for validating the commit messages already exists, a Node.js package called Commitlint. A configuration can be created to enforce the conventions we use. Commitlint uses the parser from the Conventional Commit set of tools. With an optionally tweaked configuration we can now validate our merge request titles.
Implementation
Building a Docker image
Instead of configuring the release option in a Gitlab CI/CD job we have extended the Gitlab Release CLI Docker image to give ourselves some more flexibility. Installing Node.js and the packages required for the Conventional Commit tools now allows us to lint and generate the eventual changelog with a single Docker image. Our Dockerfile looks like this:
FROM registry.gitlab.com/gitlab-org/release-cli:latest

RUN apk update && apk add nodejs yarn git
RUN yarn global add conventional-changelog-cli @commitlint/cli

COPY ./commitlint.config.js /release-config/commitlint.config.js
COPY ./config.js /release-config/config.js

RUN cd /release-config && yarn
We publish this Docker image into our private container registry. This image can then be used by different projects.
Configuring the pipeline
In our project's Gitlab configuration we can use our created Docker image to validate the merge request titles and generate the release with release notes. Validating the merge request titles is only done if a branch has a merge request. The configuration looks like this:
release:lint-merge-request:
    stage: release
    image: release-tool-image:latest
    script:
        - echo ${CI_MERGE_REQUEST_TITLE} | commitlint -g /release-config/commitlint.config.js -p /release-config/config.js
    rules:
        - if: '$CI_MERGE_REQUEST_TITLE =~ /^wip:/i || $CI_MERGE_REQUEST_TITLE =~ /^draft:/i'
          when: never
        - if: $CI_MERGE_REQUEST_ID
          when: always
When you create a release, you have to specify a version. You could read it automatically, for example from the package.json file in a Node.js project. In the example below the job has to be started manually and requires you to write the verison in a variable.
release:create:
    stage: release
    image: release-tool-image:latest
    variables:
        GIT_FETCH_EXTRA_FLAGS: '--tags -f'
    before_script:
        - if [ -z "$RELEASE_VERSION" ]; then echo "You must set a RELEASE_VERSION"; exit 1; fi
    script:
        - conventional-changelog --outfile description.md --config /release-config/config.js
        - release-cli create --name "Release $RELEASE_VERSION" --description description.md --tag-name "$RELEASE_VERSION" --released-at "$CI_PIPELINE_CREATED_AT"
    rules:
        - when: manual
The result
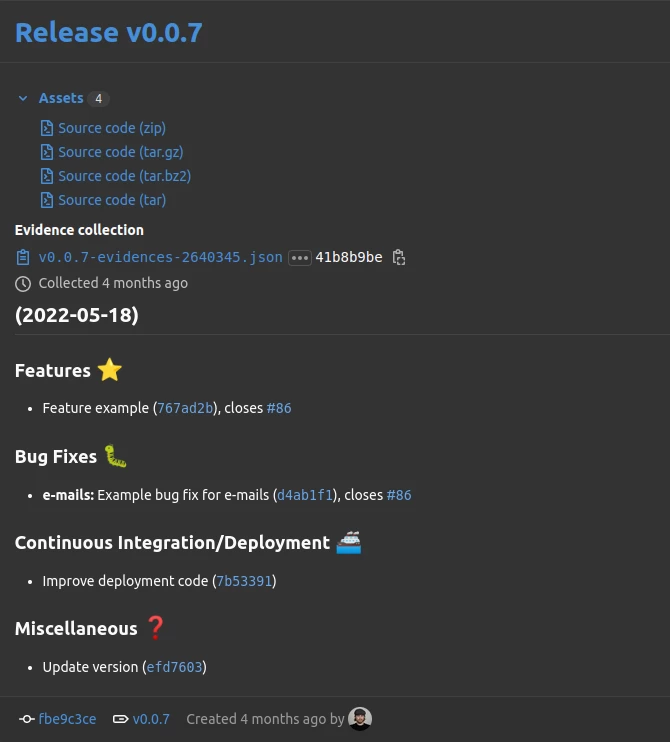
Once all the desired merge requests have been merged we can create a release on the main branch. Note: you should always release from one branch, otherwise you might have a conflicting history. Which branch is up to you. After starting the release:create pipeline job you can see a new release in your project under Deployments -> Releases. Here is what it will look like.

For the complete source code check out this Github repository.

